The Workspace
Working with Menus
Menus provide a list of commands that you can execute.
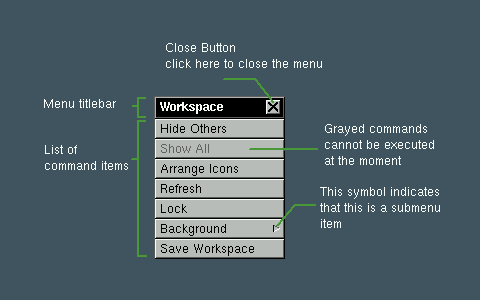
To execute a command listed in a menu, click in the corresponding item. The item will blink telling that the command is going to be executed.
Grayed commands are disabled and cannot be executed at that moment. If you click on them nothing will happen.
Some menu entries have a little triangular indicator at the right. Selecting these entries will open a submenu, with a new list of commands.
You can use the keyboard to traverse and execute commands in some of the menus. First you must hit the key used to open the menu - like F12 for the root menu - to enable keyboard traversal of it. Then you can use the Up and Down arrow keys to change the current selected item and the Left and Right arrow keys to jump between submenus and parent menus. To execute the current selected item press Return. To close the menu or stop menu traversal, press Escape. Additionally, pressing the first letter for an menu item, will jump the current selection to that item.
You can make frequently used menus "stick" to the workspace by dragging the titlebar of the menu. This will make a close button appear in the menu titlebar. If you want to close the menu, just click in that button.
Menus are normally placed on top of other windows and cannot be obscured by them. If you want the menus to be able to be obscured by lowering them, double click the menu titlebar while holding the Meta key. Repeat this to make the menus not obscurable again.
Working with Applications
In WindowMaker the instance of a running application is represented by an application icon. Do not confuse it with the icons (miniwindows in WindowMaker) displayed by other window managers when a window is iconified. Application icons and miniwindows can be differentiated in that miniwindows have titlebars, application icons do not.
WindowMaker identifies a group of windows as belonging to a single instance of an application through some standard hints that the application sets in its windows. Unfortunately, not all applications that exist set these hints, preventing some application-specific features from working. These hints are WM.CLASS, WM.COMMAND, and WM.CLIENT.LEADER or the group leader in WM.HINTS.
Note: The information about applications contained in this section only applies to versions of WindowMaker built without the --enable-single-icon compile time option. This option is unsupported and behaviour when it's enabled will not be covered in this text.
Hiding an Application
If you want to close and application but intend to use it later you can hide it. When you hide an application all windows and miniwindows that belong to that application will be removed from the screen and hidden into its application icon.
To hide an application:
Click the miniaturize button of any of the windows that belong to the application while holding the Control key.
OR
Press the keyboard shortcut assigned to it, which is Meta+h in the default configuration.
OR
User the hide command in the window commands menu brought up when the window titlebar is clicked with the right mouse button.
OR
Use the (Un)Hide command in the application icon commands menu brought up when the application icon is clicked with the right mouse button.
To unhide an application
Double click the application icon with the left mouse button.
OR
Use the (Un)Hide command in the application icon commands menu brought up when the application icon is clicked with the right mouse button.
When you unhide an application, all it's windows and miniwindows will brought back, and you will be taken to the last workspace in which you worked with that application.
Extra Bindings
Action |
Effect |
|---|---|
Double-click the application icon while holding the Meta key |
Unhide the clicked application, and hide all other applications that are present in the current workspace. |
Double-click the application icon while holding the Shift key |
Unhide the clicked application in the current workspace |
Double-click the application icon with the middle mouse button |
Unhide the clicked application and deminiaturize all its windows. |
Double-click the window titlebar with the right mouse button while holding the Meta key. |
Hide all applications in the current workspace except for the clicked one. |
There are two other commands in the applications menu related to application hiding:
- Hide others
-
Hide all applications in the current workspace, except for the currently active one.
- Show All
-
Unhide all applications that were hidden from the current workspace
The Application Dock
The application dock is a place where you can store frequently used applications for easy and fast access. It is located, by default, on the right side of the screen.
You can click the top icon (the one with the GNUstep logo) and drag it downward to remove most of the dock from view. You can also drag it sideways to move the entire dock from side of the screen to the other.
A menu similar to the application icon menu is brought up when you click a docked icon with the right mouse button.
To make the dock float over windows (not be coverable by windows), either double-click the top dock icon while holding the Meta key, or select the "Floating Dock" option in the dock menu.
Starting a docked application
To start an application that is docked, double-click its icon. The icon will be briefly highlighted and the application will start.
While an application is not running an ellipsis is present in the lower left-hand corner of the icon. This ellipsis will disappear when the application is started and reappear when the application is exited.
While the application is running the docked icon will behave just like a normal, undocked application icon, except for some extra actions specific to the dock.
To start a docked application:
Double-click the application icon with the left mouse button.
OR
Use the "Launch" command in the dock menu for the icon. If the application is already running it will start another instance.
OR
Hold the Control key while double-clicking the icon to start another instance of the application.
If a new instance of an already running application is started it will get a new application icon.
Customizing the dock
To add new applications to the dock, you can click an application icon and drag it onto the dock. When a ghost image of the icon appears you can release the mouse button and the icon will be docked.
To reorder the docked applications, drag an icon to an empty slot and move the icons around as you want.
To remove a docked application, drag it from the dock and release the mouse button when the ghost image disappears. To remove the icon of an application that is running, hold the Meta key while dragging it.
Configuring the docked application
To change the settings of a docked application, select the "Settings..." item in the dock menu for that icon. A settings panel for that icon will appear.

In the Application path and arguments field, the path for the application and its arguments can be changed. Note that you can't change the application that is represented in the icon or change anything that would cause the application name to be changed. For example, if the icon is for xterm you can't change the field's value to ghostview; or if the icon is for xterm -name vi, you can't change it to xterm -name pine. Also note that you cannot use shell commands, such as output redirectors. (>, >>; etc.)
Working with Workspaces
The Workspaces Menu
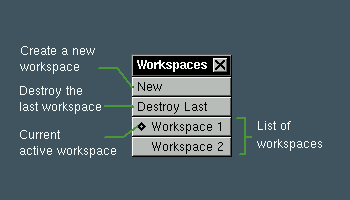
The Workspaces Menu allows you to create, switch, destroy and rename workspaces.
It has the following items:
- New
-
Creates a new workspace and automatically switches to it
- Destroy Last
-
Destroys the last workspace unless it is occupied
- Workspaces
-
Each workspace has a corresponding item in the Workspaces menu. Clicking in one of these entries will switch from the current workspace to the selected workspace.
The current active workspace is indicated by a small indicator at the left of the workspace item.
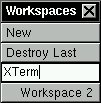
To change the name of a workspace you must first "stick" the menu. Then Control click in the item corresponding to the workspace you want to rename. The item will turn into a editable text field where you can edit the workspace name. To finish editing the workspace name, press Return; to cancel it, press Escape.
There is a limit of 16 characters on the length of the workspace name.
An example Workspace menu being edited:
The workspace clip
[This section was unavailable in the original, and thus is not here]