| LAST: Step 2 Processing Events | Contents | NEXT: Programming Details |
As a window is a widget, we can create a button for it with the function
WMButton * WMCreateButton (WMWidget *parent, WMButtonType type)
To make the button visible, the function WMMapSubwidgets may be called on the window. A call to WMMapWidget on the button will do the same of course. Before mapping the button, its properties can be set with functions whose names speak for themselves
void WMSetButtonText (WMButton *bPtr, char *text)
void WMSetButtonTextAlignment (WMButton *bPtr,WMAlignment alignment)
void WMSetButtonAction (WMButton *bPtr, WMAction *action, void *clientData)
void WMMoveWidget (WMWidget *wdiget, int pixelstoright, int pixelsdown)
WMScreen * WMWidgetScreen (WMWidget *widget)
WMSize WMGetViewSize (WMView *view)
void WMMapSubwidgets (WMWidget *widget)
As windows and buttons are both widgets, WMResizeWidget() is the same as for the window above, just as the function to set the background colour. Sizing and moving is in pixels, movements are in pixels from the parent widget's upper left corner. The default action on a button, which is a mouse click, will call the WMAction function, just as happens with the CloseAction on the window. WMAlignment can be WALeft, WACenter, WARight or WAJustified.
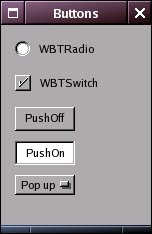
The different WMButtonTypes are
WBTMomentaryPush, WBTMomentaryChange,WBTMomentaryLight
WBTPushOnPushOff, WBTOnOff, WBToggle
WBTSwitch, WBTRadio
WMButton * WMCreateCustomButton (WMWidget *parent, int behaviourMask)WMMoveWidget is used to place it correctly.
Buttons can be grouped together by using a WMBox widget. You would do this when you want to do something fancy with the buttons, eg. filling the width of a part of the window, and resizing with that part. Create the box before creating the button, WMMap the button, and next add the latter's view, extracted with WMWidgetView() to the box:
WMBox * WMCreateBox (WMWidget *parent)
void WMSetBoxHorizontal (WMBox *box, Bool TrueorFalse)
 void WMAddBoxSubview (WMBox *box, WMView *buttonsview,
                             Bool expand, Bool fill, int minSize,
                             int maxSizeor0, int space)
void WMSetBoxBorderWidth (WMBox *box, unsigned width)
void WMSetViewExpandsToParent (WMView *boxview, int leftOffset,
                                      int topOffset, int rightOffset,
                                      int bottomOffset)
In the WMAddBoxSubview function, setting expand to True will stretch the button to the height of the box. space sets the space after the button. To resize the widgetbox with the window, you can use the WMSetViewExpandsToParent function. Otherwise, you can calculate your own positions, and move the box to where it is supposed to be in a resized window. There are other ways to group buttons, or other widgets, eg. by a frame.
WMSize WMGetViewSize (WMView *view). As before, the function WMWidgetView casts the widget into a view. WMWidgetScreen returns a pointer to the screen in which the widget was created.
We thus can get the window's size, and place widgets in their correct positions. What is left to do is a function which handles the event that the user resizes the window. The buttons, or the box containing them, should move to their correct positions in the window again in such an event, or resize with the window itself. There is an event WMViewSizeDidChangeNotification when the window is resized. For a WMWindow win, passing WMWidgetView(win) as the last argument to the function below will define what to do when this event occurs.
void WMAddNotificationObserver (WMNotificationObserverAction *observerAction, void *observer,const char *name, void *object)
The third argument should be the event's name (WMViewSizeDidChangeNotification), and the first argument is the name of the function which will be called. This function should look like void observerAct(void *self, WMNotification *notification). It is all done in the sample code here.
   WMSetViewNotifySizeChanges(WMWidgetView(win), True);
  WMAddNotificationObserver(resizeHandler, NULL, WMViewSizeDidChangeNotification, WMWidgetView(win));
Before the main function we define the function (resizeHandler) which will handle the resize event for the two widgets, the text area and the box with buttons. There is a global variable ButtonsetSize, which contains the size of the box with buttons:
 WMSize ButtonsetSize;
 static void resizeHandler(void *self, WMNotification *notif){
 WMSize size = WMGetViewSize(WMWidgetView(win));
 WMMoveWidget(box, size.width-ButtonsetSize.width, size.height-ButtonsetSize.height);
 WMResizeWidget(text, size.width-MARGIN -10, size.height-80);
}
static void handleEvents(XEvent *event, void *data)
{int i=0;
    WMWidget *widget = (WMWidget*)data;
    switch (event->type) {
    case ButtonPress:
      while (i<40)textbuf[i++]=' ';
      snprintf(textbuf,39,"Button down at (%i,%i) \n-",event->xbutton.x,event->xbutton.y);
      WMFreezeText(text);
      WMAppendTextStream(text,textbuf);
      WMThawText(text);
      break;
    }
}
.xbutton. When the button is pressed, we get that information, and print it to the text area.
The text is written to a text area. Function names for it are self-explanatory. We create this widget after creating the window. It will be WMmapped by the final WMMapSubwidgets. The code for setting it up is just:
 text = WMCreateText(win);
  WMResizeWidget(text, WINWIDTH-MARGIN, WINHEIGHT -80);
WMMoveWidget(text, 10, 10)WMAppendTextStream function.
The important functions in creating the box and its widgets are:
box=WMCreateBox(win);
WMSetBoxBorderWidth(box, MARGIN);
WMSetBoxHorizontal(box, True);
Button =WMCreateButton(box,WBTMomentaryPush);
WMSetButtonAction (Button, selectFiles, NULL);
WMMapWidget(Button);
ButtonsetSize = WMGetViewSize(WMWidgetView(QuitButton));
WMAddBoxSubview(box, WMWidgetView(QuitButton), True,False, 60, 1000, MARGIN);
/*-- make and add another button --*/
WMResizeWidget(box, 4*MARGIN+2*ButtonsetSize.width,2*MARGIN+ButtonsetSize.height);
ButtonsetSize =WMGetViewSize(WMWidgetView(box));
resizeHandler(NULL,NULL)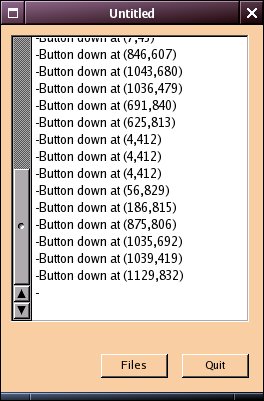 The box is created before the button is, because the button will have to be created with the box (its parent widget) as its first argument. The box is the "outer" widget and will be mapped with
 WMMapSubwidgets, but we map the buttons separately. The function which will be called on the default button event is closeAll() for the quit button. The file button will call the selectFiles() function, in which we open a file selector widget. We have left it to WINGs to decide what size the button will be. We temporarily use ButtonsetSize to store this size. We add the button's view to the box. After adding all the buttons, We store the size of the resulting box, and use it in our resizeHandler function to keep the box in the corner. 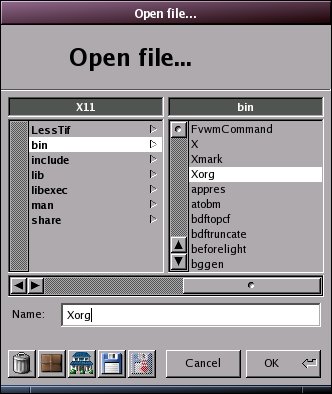 .Following the source code, pressing the file button will pop up the file selector dialog, and the name of the selected file is printed in the text area. Notice that, without the box widget, we would need two global Button pointers to change the position of both buttons in the resizeHandler function. We now need one Button pointer, which can remain local to
 main.
Here is the full code which we have now. As we have a text area, we can print text to it, as long as we are sure that the widget has not been destroyed. The scroll bar next to the area is obtained with one single function call.
The WMBox needs quite some configuration. It is not really intended for putting two simple buttons in a corner. We can use a frame to keep widgets together and move them with one single pointer. For buttons, we could also use the WMGroupButtons function to handle a group of buttons with just one pointer. To use a frame, use this code, instead of the WMBox functions: At global scope:
WMFrame *controlframe;
static void resizeHandler(void *self, WMNotification *notif){
     WMSize size = WMGetViewSize(WMWidgetView(win));
     WMMoveWidget(controlframe, size.width-ButtonsetSize.width, size.height-ButtonsetSize.height);
     WMResizeWidget(text, size.width-MARGIN -10, size.height-80);
}main:
  controlframe=WMCreateFrame(win);
  Button =WMCreateButton(controlframe,WBTMomentaryPush);
  ButtonsetSize = WMGetViewSize(WMWidgetView(Button));
  WMMoveWidget(Button,MARGIN, MARGIN);
  /* (code to create a second button of the same size, with the same pointer)  */
  WMMoveWidget(Button,2*MARGIN+ButtonsetSize.width, MARGIN);
  ButtonsetSize.width = 3*MARGIN+2*ButtonsetSize.width;
  ButtonsetSize.height=2*MARGIN+ButtonsetSize.height;
  WMResizeWidget(controlframe,ButtonsetSize.width,ButtonsetSize.height);
  WMMapSubwidgets(controlframe);
As we created the buttons inside the frame, we WMMoveWidget them along coordinates with respect to the frame's upper left corner. We have left it to WINGs to set the buttons' size, so we get their size with WMGetViewSize. With the button sizes, we calculate what size the frame is to have, and how far we need to move the buttons from the upper left corner to get them to the right place. We WMMap both buttons inside the frame with WMMapSubwidgets(controlframe);. The frame is the outer widget, and will be WMMapped just before the window. Replacing the box with the frame, we get this source code. After compiling, we get the same application. The obvious frame properties are set with the frame functions
The three steps up till now have shown the important points in programming with the WINGs library. The basics are all the same all the time. Create, specify WMAction, define the WMAction function somewhere, WMMap the widget. If this won't do, use PostNotification, and AddNotificationObserver to the widget which should react to it.
From the next sections, the library description gives a whole range of widgets which you can fit into the window this way, and related functions and data structures. There is sample code for those widgets whose code seems a bit more involved. The only thing which cannot be obtained by a simple function call is a menu with submenus, which is to work under any window manager, not just Window Maker. The third programming detail section explains, how to programme this kind of menu. The other two programming detail sections are not about the WINGs/wraster/windowmaker libraries themselves, except for a short section on the use of the WINGs functions to insert icons into widgets. Detail section 1 contains an example of how to get rid of the disappointing xterm window which you need to start your windowed application from, to read its messages on stderr or stdout. It shows the standard code to open a logging window on the screen when needed. For convenience, it uses xconsole for this, a standard application on unix systems with X11. The same section 1 shows how to get the correct information about monitor resolution when a virtual screen is used. Detail section 2 gives code samples which demonstrate how to mix Xlib code with the WINGs library. Xlib is the library which gives direct access to the X-server, and which is the underlying code to the WINGs library itself. It also contains a section which shows how to use OpenGL 3D graphics code in a WINGs frame. These extra sections do not explain all the details on the used libraries. However, by just following the code examples, you can reproduce their results, and change them to use them in your own programmes.
| LAST: Step 2 Processing Events | Contents | NEXT: Programming Details |